Sunday, 29 July 2012

Mini Cakes: Apple Pie, Carrot Cake, Red Velvet Cake, Flourless Chocolate Torte

Yesterday was a super busy night. I had all the ingredients for the 4 mini cakes ready (prep work) the night before baking and enlisted the help of my trusty boyfriend to bake up a storm.

And they turned out beautifully:


I've done some of these recipes before, and have the previous post linked. Because they're mini cakes, I did do some of them slightly differently (E.g. layering a cake), so I've included those photos and instructions. 

Some of the process work from my Apple Pie (recipe and instructions here):


Some of the process work for the Carrot Cake (recipe and instructions here):

I have a horrible fear of my cakes to sticking to the pans, so I always spray my pans with an oil spray (I used PAM),  draw out my parchment paper to fit the pan, cut it out, and stick it in.

Tada! Lined and ready for filling with batter.

Layering a cake: Take a ruler and measure down the sides, stick 4 toothpicks on each side of the cake, making sure they're exactly the same, and cut across slowly. I usually make a line connecting all the toothpicks, then slowly cut across.


Frost the cakes, put it in the fridge, then do a second layer of frosting.

My decorative carrot cake!
The Red Velvet Cake (recipe and instructions here):
I didn't actually take any photos for the process because it was very straightforward. The only thing that changed was how I layered the cake, following the exact same steps as the carrot cake above.


Added some white chocolate shavings and cocoa powder to top the cake
Some of the process work for the Flourless Chocolate Torte (recipe and instructions here):

Melting chocolate and butter on a double boiler

Mixing in beaten egg yolks with the chocolate syrup, messy messy

Glazing the cake

Added some white chocolate shavings on top!
Enjoy!

- Jane


Saturday, 28 July 2012

Flourless Chocolate Torte

I tried this for the first time last night and messed up the first batch. After frantically youtubing for help, the second batch turned out much better. The chocolate torte is a very dense cake that has no flour in it, but has fluffy egg whites beaten into it so it rises slightly.


Ingredients (for an 8-inch round cake):

  • 10 oz. bittersweet chocolate, finely chopped
  • 3/4 cup unsalted butter, cut into 2cm pieces
  • 5 large egg yolks
  • 1/4 cup plus 2 tbsp white sugar
  • 1 tbsp dark rum or brewed espresso (optional)
  • 1 tsp vanilla extract
  • Pinch of salt
  • 3 large egg whites, at room temperature
Chocolate Glaze:
  • 1/2 cup butter
  • 8 oz. bittersweet chocolate
  • 2 tbsp light corn syrup
Preheat your oven to 300 degrees fahrenheit.

For your cake, mix your bittersweet chocolate and unsalted butter in a double boiler. Set it over barely simmering water, and melt, whisking to blend. Set it aside to cool once you're done.


In a separate bowl, beat your egg yolks, 1/4 cup sugar, dark rum (if using), vanilla, and salt on medium-high speed. Beat it for about 10 minutes until tripled in volume and very pale in colour.


Slowly pour in your chocolate syrup mixture, and beat it until well blended. 


In a separate, very clean bowl, beat your egg whites on medium-high speed until foamy. Make sure your bowl and whisks are completely oil-free. Beat quickly for 1-2 minutes. Gradually beat in your remaining sugar. Continue beating for another 1-2 minutes. Test your egg whites by lifting your whisk and seeing if the foam stands upright without falling.


Scoop half of your egg whites onto the chocolate mixture and fold in gently (taking your spatula, gently mix from the middle of the mixture to the outside). Be gentle with the egg whites! Fold in your remaining egg whites and keep folding until streak-free.


Pour your batter into the pan and spread it out evenly. Bake the torte for about 35 minutes, until it puffs slightly and a toothpick inserted comes out moist but not liquid. Cover and refrigerate at least 4 hours, or leave overnight.

For the chooclate glaze, combine your butter and chocolate on top of a double boiler. Set over barely simmering water and melt, whisking to blend. Remove from heat and whisk in your corn syrup slightly, until smooth and glossy. Slowly pour it over the centre of your cake and let it cover the cake evenly. Refrigerate again for about 2 hours.


You can shave a bit of white chocolate on top for garnishing, or use raspberries and a raspberry sauce.


And that's it! Enjoy baking.

- Jane

Apple Pie

This is by far my favourite thing to make. An apple pie also doesn't take as many ingredients, making it pretty practical to make if you've got some butter, flour, sugar, and apples lying around.


Ingredients: (for an 8-inch pie)

Pastry dough:
  • 2 1/2 cups all-purpose flour
  • 2 tbsp sugar
  • 1 tsp salt
  • 1/2 cup cold unsalted butter, cut into 2 cm pieces
  • 6-10 tbsp very cold water
Pie filling:
  • 3 lb baking apples (about 6 regular apples, I like to vary the apple type, but usually go with Gala)
  • 2/3 cup firmly packed dark brown sugar
  • 3 tbsp all-purpose flour
  • 1 1/4 tsp ground cinmamon
  • 1/4 tsp grated nutmeg
  • 1 tsp vanilla extract
  • pinch of salt
Preheat your oven to 425 degrees fahrenheit.

Start with your pastry dough: mix your cold butter and all-purpose flour in one bowl. The reason why the butter must be cold is because you will work the mixture with your hands, and the dough won't hold if it's melty.


Work it with your hands to break apart the butter, so the flour and butter have almost a crumb texture. You can do this with a food processor as well, just chop it in the food processor quickly until a crumbly texture.


Pour in 6 tablespoons of cold water to start, and knead to form a ball. Pour in more tablespoons as you go so the dough forms a ball. The dough should just stick as a ball, and not be wet from too much water. If it is, just mix in a little more flour.


Once you've got it, wrap it in plastic wrap, and put in the fridge for 30 minutes to an hour. You can leave it overnight if you're making the pie the next day. Just kneed it more if you take it out the next day. Separate the dough into halves.


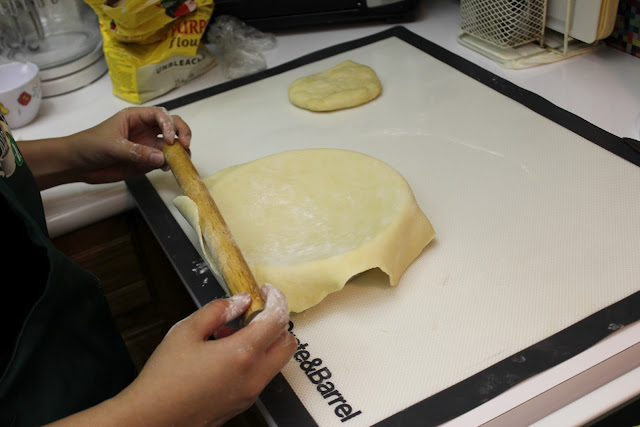
Dust the dough and your rolling surface with flour (don't let it stick!), and roll out with a rolling pin until it can hang about 1 - 2 inches off the sides of your baking tray.


Flour it down, make sure it's not sticky.


Slowly, roll it onto your rolling pin lightly. You're transferring it to your baking tray.


Hang 1-2 inches off the side of the baking tray and slowly roll over lightly.


Lightly push it into your tray (don't rip it!), and poke the bottom with a fork.


Peel your apples, dice into small cubes (to your liking), mix in your cinnamon, nutmeg, brown sugar, and white sugar, and toss it around so it's well mixed. Throw it into your baking tray. Following the same steps as before, roll the 2nd half of dough onto your rolling pin and transfer to your baking tray.


Crimp the sides down with a fork or roll it inwards by taking the bottom dough, and rolling the top dough inwards. 

Taking a brush, you can glaze the pie with milk or a beaten egg. I beat an egg and brushed it over to give it a glossy finish. 

Bake it for 15 minutes, then lower the temperature to 350 degrees fahrenheit. Bake for another 40-50 minutes until the top is golden. 


Enjoy baking my favourite pastry!

- Jane

Thursday, 26 July 2012

Prep Work

My friend is having me make 4 mini cakes for her mum's party so I prepped tonight for tomorrow night's baking:

I'm making a Red Velvet Cake, Carrot Cake, Apple Pie, and a Flourless Chocolate Torte.


I've never prepped before baking before, so this was new. I also have little to no time because I have an exam tomorrow night, but this clears my head a bit.

A recipe for Apple Pie and Chocolate Torte will go up tomorrow night!

Thanks for coming by,

Jane


Sunday, 15 July 2012

Coconut Cupcakes

These are coconut cupcakes with a Swiss Meringue Buttercream frosting!

The middle cupcake was my perfected Swiss Buttercream. The one on the right was less successful. However, it was the exact same portions, steps, even the same batter as the left one. Just skipped one small step.
I actually learnt this coconut recipe from a class at the Bonnie Gordon College of Confectionary Arts, and they were delicious. Mind you though, they were very very sweet. So in my recipe, I've cut down on the sugar content a little bit. You can always up it if you're big on sugary cupcakes.

During my class, they topped the cupcakes with a Swiss Meringue Buttercream frosting. I love love love this frosting, but find it extremely difficult to make (I tried 4 times for these cupcakes, imagine how frustrating that is). Basically, it's an egg white, sugar, and butter frosting, with a little bit of vanilla. The egg whites and sugar are heated on a double broiler, and the butter and vanilla is beat in. There's also an Italian Meringue Buttercream (which is practically the same) but it's done in a slightly different order. Therefore, I've made a completely separate post for the Swiss Meringue Buttercream. So check that out!

Ingredients for the coconut cupcakes (makes 12):

  • 1 1/4 cups of all-purpose flour
  • 1 tbsp potato starch
  • Pinch of salt
  • 1 tsp baking powder
  • 2/3 cup fully shredded fresh coconut (these come in cans) or 1/3 cup toasted dried coconut (you can toast them yourself)
  • 75 ml coconut milk
  • 75 ml plain yogurt or sour cream
  • 1 tsp coconut extract
  • 2/3 cup unsalted butter (room temperature)
  • 3/4 - 1 cup sugar
  • 1 large egg
  • 2 tbsp vegetable oil
  • 1/2 tsp baking soda
  • 1/2 tsp white vinegar
Preheat your oven to 350 degrees Fahrenheit, and line your cupcake tray.

Beat your butter in a bowl (just to make it easier to beat later), mix in your sugar with the butter and beat for 30 seconds. Then beat in your egg and vegetable oil. Pour in your coconut milk and yogurt/sour cream, and just mix that with a spatula.

In a separate bowl, your dry ingredients: flour, starch, salt, baking powder. In three portions, mix your wet into your dry ingredients bowl, and beat in slowly each time. 

Toast up your dried coconut in your toaster oven for 2-3 minutes (if it wasn't toasted to begin with) and mix into the overall mixture. Be careful not to burn them!


In a little bowl, mix in your baking soda and white vinegar quickly so it fizzes up, pour that into your batter, quickly mix, and scoop into your baking tray. (The baking soda and white vinegar mix is my secret to making cupcakes rise, so do that quickly right before going into the oven).

Bake for 12-15 minutes. If you often end up with dry cupcakes or hard cupcakes, it's mostly because you're over-baking them. Check at the 12 minute mark to give you an idea of how done it is. If you stick a toothpick in and it's completely not set, you'll know you need 3-5 more minutes. If it's just about done but slightly gooey on the top, bake for another minute or two. 


You can choose to do an American Buttercream frosting, where it's just icing sugar, butter, vanilla, and milk, but I strongly detest that frosting. It's extremely sweet and just kind of tastes like icing sugar. However, it's much much easier. Nonetheless, here's a recipe for that.

You could also choose to the Swiss Meringue Buttercream route, which is much tastier, less sweet, creamier. but much more difficult. Here's the recipe for that. 

Swiss Meringue Buttercream

Swiss Meringue Buttercream, oof.


I say oof because of how many bad batches I made to get one good batch. But I did learn how to get that good batch! However, I loooove the taste of this frosting. I also love the smell of it, it reminds me of the steam milked that goes into lattes.

Ingredients:

  • 4 egg whites
  • 3/4 cup of granulated sugar
  • 1 cup of butter
  • 1 tsp vanilla extract
  • Pinch salt
Here are my tips to start out:
  • Try to touch the egg whites as little as possible, oil can ruin a meringue real easy.
  • Wipe down your bowls with water and lemon juice to get all the oil off.
  • Have 3 bowls for separating, one for yolks, one for whites, and one for mess-ups. Yolk in a meringue can mess it up just like oil does.
Get a pot, put in water (about 1/4 of the pot depth), and simmer it.

Meanwhile, separate your 4 eggs, and pour the egg whites into a heatproof bowl (that will go into your double broiler) and add the sugar (make sure it's lump-free!).

Double broiler:


Whisk slowly to mix for about 3 minutes, until it's been perfectly blended. To test, scoop a little out, it should be warm and smooth when rubbed between your fingers. Once it is, take it out, get out your eggbeater, and beat on high-speed for about 10 minutes or until stiff peaks (lift up and it should stay up).

Okay, now this is super important I missed these steps my first 2 failed batches and it turned out as goop. Cool your egg whites completely. This is around 10-20 minutes, until the very bottom of your bowl feels completely neutral. As well, your butter must be cool. So about 20 minutes out of the fridge. This isn't room temperature, because it'll turn to goop when mixed, but not cold, because cold butter gives lumps when whipped. 

Think about it this way, if your egg whites are still warm and you put your butter in, it'll melt, and your frosting definitely won't hold.

Whip your cooled butter in one bowl, just to get rid of lumps. In your separate bowl with the egg whites, rewhip those. This is what I messed up on in the 3rd batch. You must rewhip your cooled egg whites because it'll give almost a curdled look if you mix it straight with the butter. After everything is whipped, mix your butter into the egg whites, add your vanilla and salt, and beat on slow speed for 1-3 minutes until stiff enough to hold its shape. 

See how it's smooth but also holds its shape?

 Put it into your piping bag, and pipe onto your cupcakes!


Notes:
  • If it does become too runny, you can put it into the fridge for 30 minutes, take it out, and try to rewhip it.
  • You can put it in the fridge for 2-3 days and rewhip it for 5 minutes to reuse
  • You can also freeze it for a while, and rewhip it
And there you are! Swiss Meringue Buttercream Frosting. Enjoy making!

- Jane Bakes Things