Cupcakes have always driven me crazy. Always. Which is why I NEEDED to get them right this time, for my own sake.
My cupcakes have always turned out too stiff, didn't rise enough, or the frosting didn't set right.
This recipe made the cupcakes turn out just the way they should! The original recipe stated 12 cupcakes but it really only makes about 9. However, it does make 9 of the most delicious fluffy cupcakes with the creamiest frosting.
What makes the difference is mixing baking soda and vinegar at once into the cupcakes and the whipping cream in the cream cheese frosting.
For the cupcake you'll need:
(check out the note right under the ingredients list)
- 1 1/4 cups sifted cake flour
- 1/4 teaspoon baking powder
- 1/4 teaspoon salt
- 1 tablespoons cocoa powder
- 1/4 cup unsalted butter, at room temperature
- 3/4 cups granulated white sugar
- 1 large egg
- 1/2 teaspoon pure vanilla extract
- 1/2 cup buttermilk
- 1 tablespoon liquid red food colouring
- 1/2 teaspoon white vinegar
- 1/2 teaspoon baking soda
Note:
No cake flour? Substitute 1 cup of cake flour for 1 cup of all-purpose flour minus 2 tablespoons
As well, if you can't find buttermilk or can't be bothered to: Substitute 1 cup of buttermilk for 1 tablespoon of lemon juice or white vinegar and use milk for the rest to achieve 1 cup, and let it sit for 5-10 minutes!
For the frosting, you'll need:
- 4 ounces (1/2 cup) cream cheese, room temperature (this has been recently changed, I halved the quantity of the cream cheese)
- 1/2 teaspoon pure vanilla extract
- 1/2 cup confectioners' (icing or powdered) sugar, sifted
- 2/3 cup cold heavy whipping cream (double cream) (35-40% butterfat)
Okay! Start with preheating you oven to 350 F or 175 C. Line your muffin tray with your baking cups (cupcake liners?)
In a large bowl, sift your flour, baking powder, salt, and cocoa powder together (especially that cocoa powder)
In a separate bowl, use a mixer and beat your room temperature butter at low-medium speed until soft. Add in your sugar and continue beating for a minute or so until fluffy and well-mixed. Add in your egg and vanilla extract.
In a measuring cup or small bowl, mix your buttermilk with your red food colouring. Be careful to put a towel under because red food colouring stains horribly.
With your mixer at low speed, alternate between your flour mixture and buttermilk + food colouring mixture in three additions. Start and end with your flour mixture.
Mix the baking soda with the white vinegar in a small bowl. It should fizz up nicely or else your baking soda is a bit too old. Working quickly, mix into your cupcake batter. From there, divide your batter up into the muffin tray.
The batter should be a brilliant red like so:
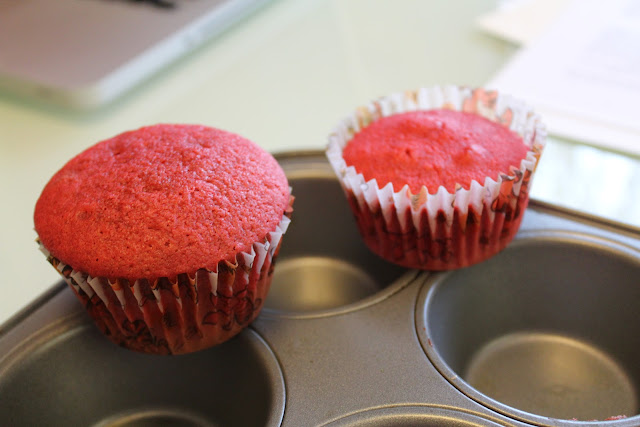
Here's how important that baking soda and white vinegar mixture is:
The one on the left is with, and the one on the right is without
Pop your tray in the oven and bake for 18-23 minutes until a toothpick comes out clean.
Meanwhile, clean up and make the frosting!
The original recipe calls for beating your in all your ingredients with the whipping cream going in last, where it will whip up and become thick and hold well.
However, that method is way too easy to mess up. So I somewhat worked backwards.
In one bowl, beat your cream cheese until very smooth. You don't want any cream cheese lumps in the frosting. Mix in your icing sugar and vanilla extract.
In another bowl, beat your cold whipping cream on high speed for a couple of minutes until it turns into a light whipped cream consistency, holding soft peaks. They don't have to be stiff peaks just yet because they will be beat a little more.
Once it's holding it's peak, mix in your cream cheese mixture and beat quickly until the lumps are out, and it holds it's shape. Don't over-beat because it may turn into an even runnier consistency.
Here's what the frosting should look like:
After that's done, put it into a piping bag with any piping tip, be sure to squeeze out the excess air, and have fun with it. For reference on how to assemble a piping bag, look at the last post!
Enjoy and good luck!
- Janeator Bakin'


